Stash Bust!

stashbustparticipantbadge_resizeable.jpg

I’ve been going a tad crazy buying a bunch of craft supplies so when I discovered this Stash Bust on Dollar Store Crafts, I figured I’d give it a go and Yves will surely be happy about that! Plus there are prizes to be won! I hope I can do it!

Recent creations!

Yep, at it again! Crafty creations! I love when I’m productive creatively!
hipporevtote.jpg
This is a reversible tote bag I made for a swap back in February for Hippofairy. I had to hide it from my Thing-A-Days because she was a friend on that and I didn’t want her to see it!
bearglasses.jpg
This guy was made for the Send Your Handmade Specialty and it went all the way to Australia. My partner said it made her day! The pattern is from Kind Over Matter blog.
bdcrown.jpg
This beautiful birthday crown was made for my little sweetie for her birthday. She loves it and couldn’t wait to wear it!
manekocatami.jpg
For the Made With Yarn swap. I forgot the name of this cat!
buttonswapwip.jpgbuttonswapfinish.jpg
I joined the feeling stitchy embroidered button swap. This was the first time I ever made something like this. It was a bit of a challenge for me to work on such a small canvas (the button is 7/8) but it was fun and I like how they turned out!
stencilpatchdeer.jpgstencilpatchfeather.jpgstencilpatchflower.jpgstencilpatchmandela.jpg
This is for the Stencil Patch swap. I did not like the last one so did not send it although you were only required to send 2. I used stencils from Ed Roth’s Stencil 101, Stencil Me In book and Sizzix dies (last one is Stencil Me In) and acrylic paint with texture medium mixed in.
vampirebunny.jpg
A Vampire Bunny for the Monster-osity swap.

Holy Guacomole!

A couple of weeks ago I entered a contest on Consumer Craft’s blog and I won! Woohoo! The goods came Thursday in a big box. I know the original post shows a photo of the prize but it just seems like so much more when I got it!
thegoods.jpg
Besides a nifty tote bag and catalog from Consumer Crafts, there was a craft tote, a beading board kit, a set of different jewelry pliers, a bunch of beads, a beading mat and silver jewelry findings (the beading board kit has gold findings). I’m really excited about the craft tote as I am always looking for more storage options. It’s double sided and opens up! In theory, it seems really clever and I can’t wait to put it to the test!
crafttote.jpgcrafttote2.jpg

Thank you Consumer Crafts!!

ColorArtz Review!

Whenever I think about airbrushing, I think back to the airbrushed unicorn sweatshirt I had and the airbrushed heart with my name and my boyfriend’s name with our ‘steady date’ on it from high school. Anybody else remember those? Anybody? (cue the sounds of crickets)

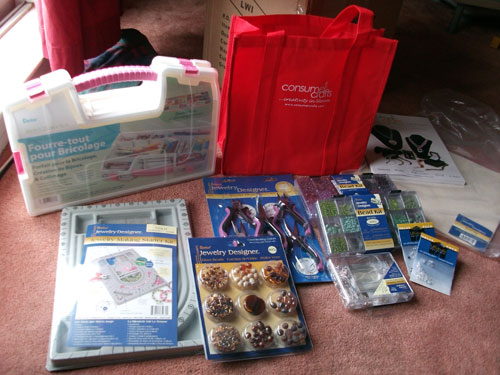
I did have an airbrush system that attached to my Pantone markers back in college (because I was crafty, not for any professional/collegiate reason) and had such fun using it (although I could in no way mimic the look of the unicorn or sweetheart sweatshirts!). I know that copic markers have a system like that and while I would love to have that, I can’t rationalize buying it (because of course, I would need the big set of colors too!) So I was delighted when I came across this fabric airbrush kit by Testors, makers of model car paint, called ColorArtz.

outofthebox.jpg

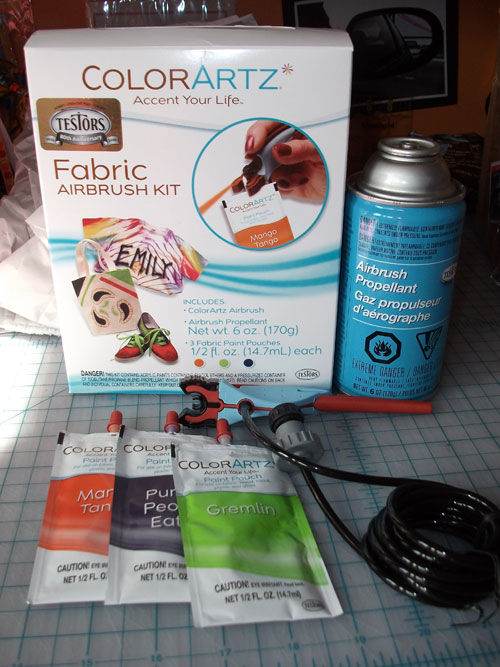
Out of the box it comes with 3 pouches of paint, the airbrush and a 6 oz. can of air compression. The colors included are orange (mango tango), a bright green (gremlin) and dark purple (purple people eater). For some reason, I thought they included a stencil in the kit as well. I was a little bummed that there wasn’t one in there, it would have been nice if they included one. They also sell stencils with a sticky back on them that can be re-used. I opted to use my sizzix machine and freezer paper to make stencils to test this out as well as some stencils from Ed Roth’s Stencil 101 book and Marthe Le Van’s Stencil Me In book.

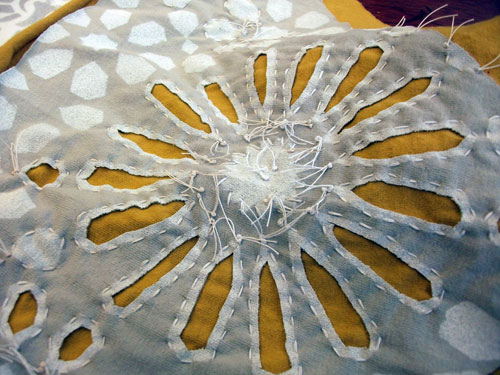
The first project I used a white 100% cotton undershirt and sizzix/freezer paper. I protected my desk area with some cut up paper bags and placed some cardboard underneath the first layer of the shirt to prevent bleeding through.
sizzixdie.jpg
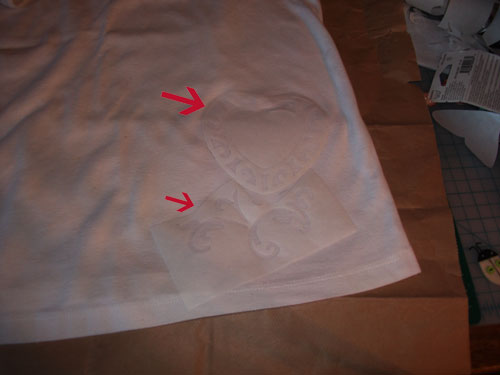
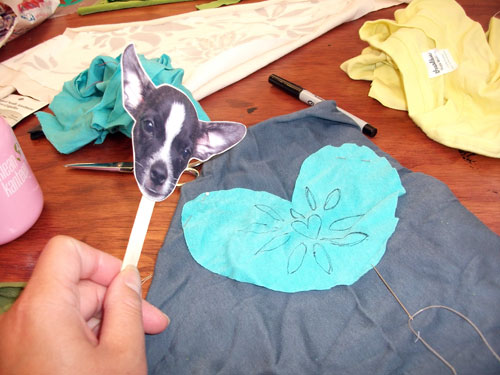
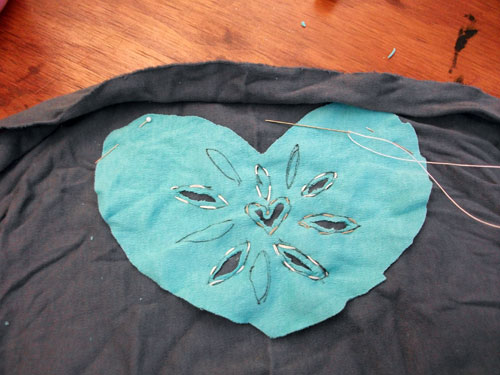
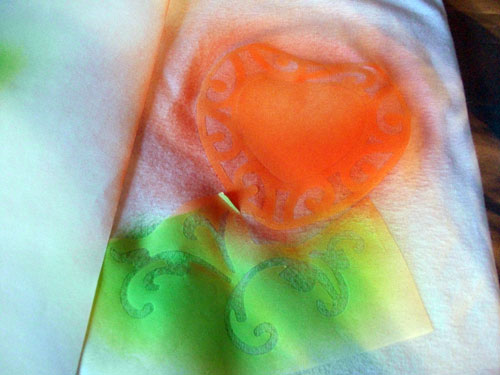
It’s a little hard to see the freezer paper so I tried darkening the image and put in the arrows to show the stencils.

I love using my sizzix with the freezer paper because when you iron the freezer paper onto the fabric, everything sticks down and you don’t have to use stencil tacky spray. The only thing with the sizzix dies is that if there is more than one image on the die, they are grouped close together so you have to take care cutting out the image you want.  And depending on your die, the pieces can be very delicate. You just have to be careful with the delicate pieces and I used scrap freezer paper to cover parts of the image I didn’t want showing up. For instance, in the heart, the middle is cut out but I didn’t want that showing through so just used the cut out to cover it up.  The instructions recommend masking at least 12 inches around your design. Of course, I did not do that and do you know what happened? I got overspray. But I don’t mind it because I feel it adds some authenticity to the airbrushing. Who wants perfect anyway? And because I am impatient and excited to try it, I used 2 stencils at the same time so you can see some orange mixed in with the green swirls.

pouchattach.jpg
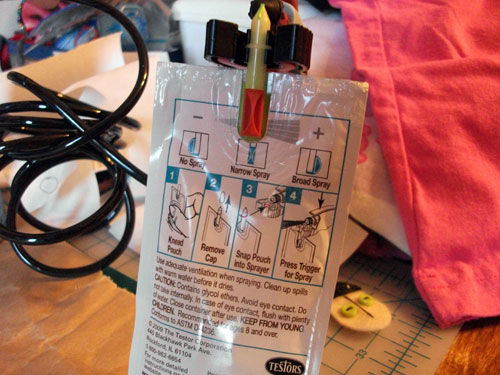
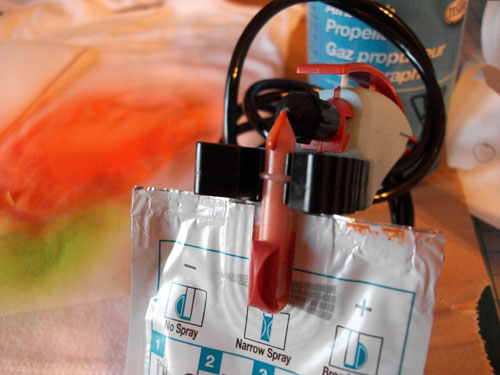
Snapping in the green pouch and setting the nozzle in the middle for a narrow spray.

It was really easy to attach the color pouches to the spray, it just snaps right in. First you have to knead the pouch a bit to make sure the color is all mixed. Just make sure the paint valve is in the off position! At one point I was kneading a pouch (probably a bit aggressively) and wasn’t paying attention and the valve moved to the open position. When I took the cap off, some paint spit out a bit and onto my table. A quick wipe and no one will be the wiser! Once I attached the pouch, I tested the spray on scrap paper to get a better feel of it. The left position is closed, the middle is a narrow spray and the right is a broad spray.
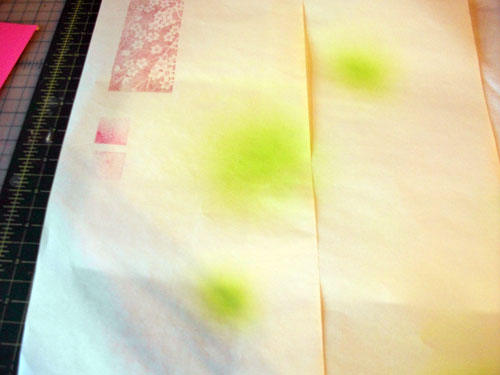
testspray.jpg
Test spray
greenspray.jpg

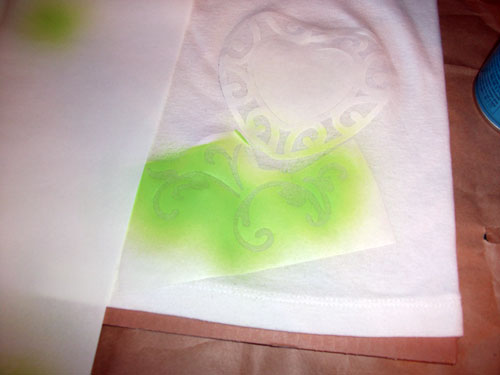
Once you get a feel of how much spray comes out, it’s really easy to glide over the stencil. It’s better to do a series of light coats instead of one or two heavy ones. There was a slight odor and the instructions recommend working in a well ventilated area. I had my window open and it was fine. It’s really easy to switch color pouches as well. I switched to the orange pouch without any problems. There can be some drippage on the spout after some spraying, as evident in the next photo. In the three projects I’ve done, nothing has dripped onto the fabric but you probably just want to keep an eye out on it and wipe it away when you see any buildup.
orangedrip.jpg
orangegreenspray.jpg
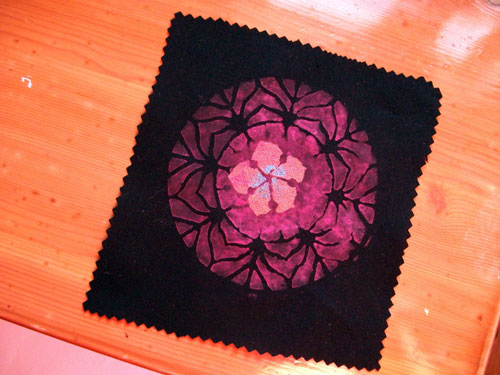
Ready to be revealed
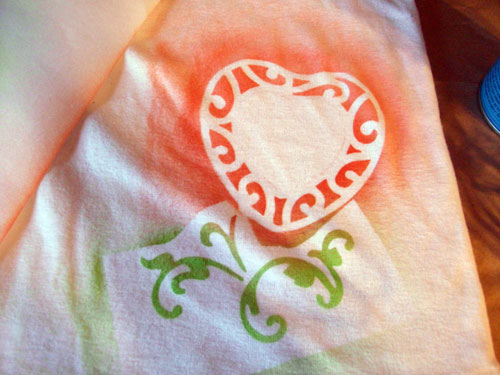
sizzixreveal.jpg
The reveal!

I must admit, I giggled with delight as I unpeeled the freezer paper and saw my creation. You can see all the overspray and like I mentioned, I don’t mind it. I do plan to put more thought with my future projects using the sizzix but being as this was my first project, I am quite happy with it!

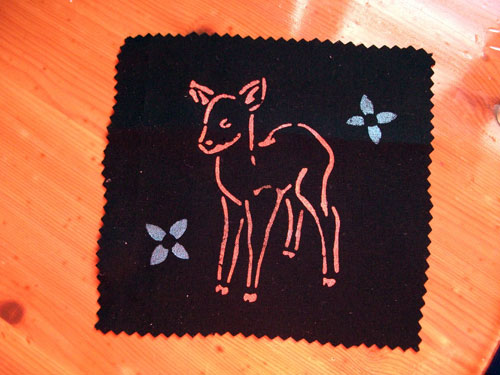
For the 2nd project, I wanted to see how the colors worked on something that wasn’t white. One of my favorite shirts (also 100% cotton) had a grease stain on it and figured this was the perfect opportunity to cover it up. I worked with the boom box stencil from the Stencil 101 book. I was a tad lazy and did not use the tacky spray and just taped it down (not every much either as you can see!).
boomboxstencil.jpg
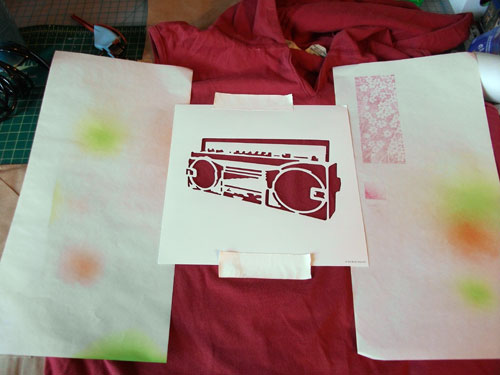
I didn’t use the pouches from the kit but the extra ones I ordered in addition to the kit. I used silver lining and black tie. After doing this stencil I have to remember to keep my spray perpendicular to the fabric and not at an angle. The instructions did mention this. You can see where I started angling and since I didn’t use tacky spray to keep the stencil down, it was easy to get in under the stencil. I did do better keeping the 2 colors separated. You can’t tell from the photo but there was some overspray at the top, near the neck because I did not mask that area. boomboxreveal.jpg
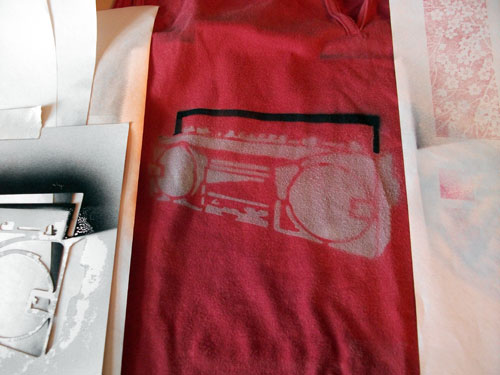
I just need to add some music notes and this shirt is as good as new!

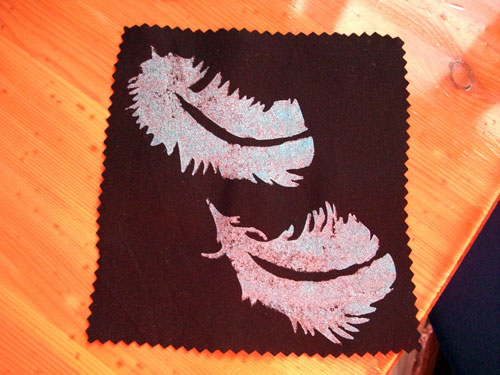
The 3rd project I tried was a shirt (100% cotton again) for my daughter. I had used this feather stencil from the Stencil Me In book on a different project so there was still some tackiness to it (yes, that time I pulled out my tacky spray!). I could have benefited from giving it another quick coat of tacky spray but opted not to.
featherblue.jpg
I did a better job of masking the whole area around the stencil. The best job of the three but I still managed to get overspray! Probably due to the fact that I again starting angling my spraying and it got through that top section that is not all taped down. A little more practice with that and I should get better with it. Or just use more tape to tape it all down!
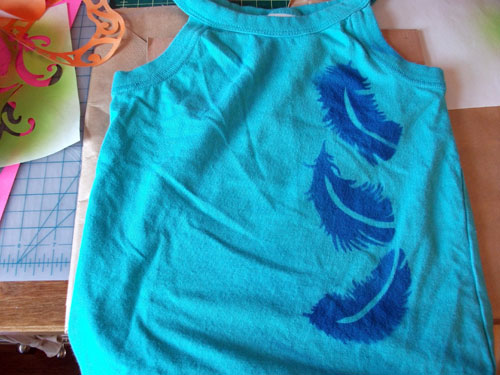
featherbluereveal.jpg
Look how cute!!

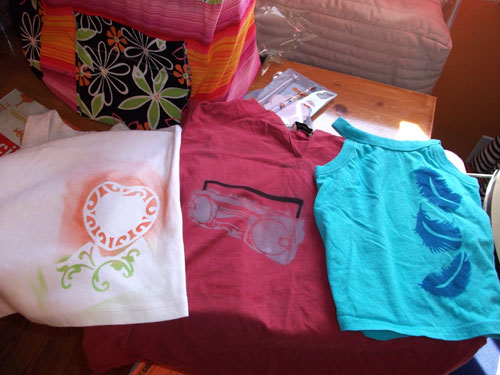
And here are all three projects side by side:
allthree.jpg

Pros:
• The kit retails for $24.99-29.99 and the pouches for $2.99-4.49 so it’s relatively inexpensive to start adding some extra style to your clothing, bags, shoes!
• Works on fabric, glass, plastic, and wood and of course paper as well so the possibilities are endless!
• A nice selection of color pouches.
• It’s easy!
• Heat setting is not necessary.
• No special fabric treatment, just wash as per instructions on your garment.

Cons:
• There is some odor so ventilation is necessary.
• Can of air compression is highly flammable.
• Ample space is needed to spread out your piece with enough masking.


Etsy Labs love

I made it to 2 Etsy labs craft nights this March. The host on the 8th was Aya Rosen of LoucheLab and we were drawing on porcelain tea cups and saucers. She had these special markers and paint for porcelain and after you draw and paint on your piece, you let it fully dry for 24 hours (it dries to the touch after 10 minutes) and bake it in the oven at 300 degrees for 35 minutes. Or something like that. I don’t draw very well so I just kept mine simple with hearts and swirls. It was a lot of fun!
porcelainblank.jpg
My blank canvas and the porcelain marker
porcelaindraw.jpg
My outline in black
porcelainpaint.jpg
All painted!

Now, see the work of a real illustrator! Aya’s work is beautiful!
louchelab1.jpglouchelab2.jpglouchelab3.jpglouchelab4.jpg

The following week Natalie Chanin of Alabama Chanin fame was hosting. In addition to her fashion line, she has 2 books; Alabama Stitch Book and the new Alabama Style Book. I confess that I didn’t know much about her (there were a couple of people there that were huge fans of hers) but after learning more about her, I totally respect her style and ethics (besides the fact that she is a total doll!). Her clothing line is all hand-stitched! Every single stitch is done by hand! No machine stitching what so ever! Amazing! She believes in sustainable clothing and believes in having good classic quality pieces that will last. The project for today was applique and reverse applique. She admitted that she loves to talk (being from the South) so she really shared a lot of information and tips. Unfortunately I am not too crazy about the piece I started. But that’s ok! I learned a lot from Natalie!
stitchstartcrusher.jpg
Crusher takes a look at the start of my piece (he is part of the “Where in the World is Crusher” swap I’m in!)
stitchcrusherrachel.jpg
Rachel and Crusher!
stitchwip.jpg
My piece. I realized after I started it that my drawing is way too small for it to show the reverse applique. Live and learn!
chanintalk.jpg
Natalie telling us about the strength of jersey knit, the only thing she works with. She is a total sweetheart!
Here are some examples of Natalie’s work:
chaninexamples1.jpgchaninexamples2.jpgchaninexamples3.jpg
Aren’t these pieces beautiful! The images were done with stencils and painted on using airbrushing. This gives me so many ideas!

Thing a day, final week!

Way behind in posting this but here is the final week, days 22 through 28!
emmaclipfinishtad22.jpgcatpillowfinishtad22.jpg
Day 22 was finishing up 2 projects started in an earlier TAD
heartearringtad23.jpg
Day 23, while waiting at the doctor’s office. I expected a longer wait but it was actually a shortish wait so therefore I only finished 1 of a pair of heart earrings.
sleepinglambstarttad24.jpg
Day 24, the start of a sleeping sheep amigurumi
feltflowers1tad25.jpg
Day 25, using my sizzix machine and felt and buttons! These turned into brooches.
sleepingsheeptad26.jpg
Day 26, finished the sleeping sheep amigurumi started on day 24!
waterslidedecals1tad27.jpg
Day 27, fun with waterslide decals!
madagascarpillowcasetad28.jpgmadagascarpillowcase2tad28.jpg
Day 28, a Madagascar pillowcase for Sienna! Thought it only fitting that I end my month of TAD with something for her. She was a witness to all my creations that sadly weren’t for her so finally! Something for her and she loves it!

Thing a day, week three

Here are days 15 through 21. As always, see the all my TADs here. Only 1 more post about my thing a day 2010!
hedgehogtad15.jpg
Day 15, a hedgehog made out of felt, an extra for a swap. I gave my partner the option to wear it as a pin.
dogtad16.jpg
day 16, another extra for a swap, a dog made out of felt. Sienna loved playing with these guys.
kokeshiembtad17.jpg
Day 17, the start of a Kokeshi stuffie embroidered. Haven’t decided where this is going yet. More photos at TAD.
cupcakedishtoweltad18.jpg
Day 18, sewed this cute cupcake fabric onto a dishtowel for a swap.
dinohuntertad19.jpg
Day 19, appliqued dinosaur shirt made for Yan Ling’s son Carter, who was born in the summer.
catpillowstarttad20.jpg
Day 20, a crochet cat pillow, or soon to be. This is for a swap too.

Thing a day, week two

I’m behind in my postings for thing a day. You can always see my current/all thing a days by clicking here. I  left off at day 7 so here is days 8 through 14 (any pattern links can be found at my thing a day posts).
heartbroochtad8.jpg
day 8, a brooch made as an extra for a swap.
emmabagtad9.jpg
Day 9, the start of a toddler messenger bag for Sienna’s friend, Emma.
earringstad10.jpg
day 10, stamping resin beads. This was a lot of fun. Next time I think it’s better to stamp using a real dark ink. It will show better on the ears. (extra photo at TAD)
catpillowtad11.jpg
Day 11, a Zakka cat pillow using a pattern from Stitching magazine, fall 2009, for a swap. More photos at TAD.
snowmansienna.jpgemmabagfinish.jpg
Day 12, a felt snowman that Sienna couldn’t wait to get her hands on. I let her play with it before I sent it to my swap partner. More photos at TAD. I also finished Emma’s bag!
batheather.jpg
Day 13, a sock bat for a swap. My first sock creature. The eyes glow in the dark.
heartwhoopietad14.jpg
Day 14! Valentine whoopie pies with a cream cheese filling. Quite yummy (‘despite how it looks’ according to Yves!)

January swaps

I had a busy month of swaps in January! I had fun doing them all!

Be My Valentine, Stitch and Bitch Embroidery Group (make 1 finished valentine theme stitch project)
I sewed her a shopping tote (pattern from a new bag book I got) and used the heart pattern from Badbirds. I received a cute heart wall hanging from my partner.
bemyvalbag.jpgbemyvalbagcloseup.jpg

Fake Fabric Food. I made a T-bone steak for my 2 partners. I received fish n chips and a valentine cookie from my 2 partners.
tbonesteak.jpg

Various heart ornament swaps
Crafting Queens group:
haveaheartcq.jpg
What Does Your Heart Say?
whatdoesheartsay.jpg
These 2 heart patterns from Orange Flower sketchbook but I don’t see it on her site anymore.
Handmade Heavenlies group:
haveahearthh.jpg
Made using my sizzix!

Japanese Magazine/book Inspiration swap in the Zakka group. My partner likes eyeballs with wings.
japmaginpsire.jpg

Hand Carved Swap. My partner likes the Japanese characters Monokuro boo
handcarvedswap.jpg

One of my favorite swaps, Wacky, Silly and Unusual Holidays, February.
wackyholfeb1.jpg
February 20 is Love Your Pet day (pattern from the long thread)
wackyholfeb2.jpg
A heart brooch for Valentine’s day. The other 2 holidays I chose were the 7th, send a card to a friend day and the 23rd International Dog Biscuit day (I printed out some homemade biscuit recipes and included a cookie cutter)

heartbookmark.jpg
Crocheted a heart bookmark (Crochet Spot) to include as an extra in one of the packages.

From the stitch and bitch embroidery group, Weekender Embroidered dish towel. The Love pattern is from Floss Box, the cupcakes from Lolly chops and the heart from an embroidery pattern book. (Notice that pink gingham yet again? It’s one of Sienna’s old receiving blankets I’m reusing!)
weekender1.jpgweekender2.jpgweekender3.jpgweekender4.jpg

An extra to include, a crocheted flower brooch (I used a thicker cotton yarn). Pattern from goodknits.
crochetflowerpin.jpg

Handmade Harajuku swap in the Harajuku girls group. Make 3 handmade items!
handmadeharajuki1.jpg
My partner likes Miffy. Pattern from This and That.
handmadeharajuki2.jpg
Pucca keychains made using Tim Holtz’s fragment charms. I was delighted there was an official Pucca website with images to use!
handmadeharajuki3.jpg
Hello Kitty magnets printed on magnet paper and topped with Diamond Glaze. I didn’t like how the diamond glaze came out so  printed out some more without putting the glaze on.

And last but not least! Sweet Treats in the Crochet Cuties and Amigurumis group!
sweettreats.jpg
A chocolate cake from my Tasty Crochet book. It came out pretty big!!

Say Cheese!

Peter asked me back in early December if I would crochet him a set of cheeses for his cheese fiend friends, Nate & Mari for a Christmas present. He didn’t mind that he would get them way after Christmas and I gave it to him early February! These patterns are from Eternal Sunshine’s Etsy shop, a talented crocheter and fellow Brooklynite! While these guys don’t look as nice and polished as ES’s, I’m pretty happy with them. They’ve got character! I laughed out loud after putting on the gouda’s red rind. I called it a pompadour while Pete was calling it an afro. The jarlsberg was actually a knit pattern with a crochet rind but since I can’t knit (yet), I followed the gouda pattern and then glued felt dots on it for the holes. I think I did a good improvisation even tho the rind is on crooked. It just looks like he had a wild night. 😉

groupcheese.jpg
Group shot! Mozzarella, Gouda, Jarlsberg, Bleu Cheese, Tetilla, Valencay, Colby Jack and Epoisses
JarlsbergEpoissesValencayGoudaColby JackTetillaBleu Cheese
You can’t really see the eyes from this photo but it’s there!
mozzarella.jpg

Here’s a picture that Mari sent me of the cheeses on their sofa. They love them!
cheesesmari.jpg

« Previous PageNext Page »